
A kitchen sink upgrade can breathe new life into the heart of your home, enhancing both its beauty and everyday use. But for many, the plumbing under the cabinet can be a daunting challenge even for the most energetic do it yourselves. The labyrinthine PVC pipes, shut-off valves, and weighty items can cause anxiety simply by staring at them. From an ordinary single sink, to a full-strength disposal in a double sink, the right methods are in your control. This complete step-by-step installation guide will take the stress out of installation, from start to finish. Following these step-by-step instructions will ensure that your new setup is flawless, drains efficiently and is completely watertight for years to come.
Table of Contents
What to Know Before You Install Kitchen Sink Plumbing
The most important part of any plumbing upgrade is preparation, which influences the ultimate success or failure of the actual plumbing installation. It is important to have basic knowledge of your home’s current systems before you ever reach for your wrench. Knowing how the building codes are different in your area helps to make sure your drain venting complies, and knowing the difference between drop-in, undermount and farmhouse sinks will affect what you should do before buying one.
For example, heavy cast iron or fireclay sinks need more cabinet support whereas stainless steel sinks are lighter and easier to move around. By knowing exactly what your current countertop cutout will allow, you will avoid any unnecessary changes, delays, and problems later in the project.
Gathering the Essential Tools and Materials
The correct gear makes for a clean, hassle-free instal. You should at least have a cup or basin wrench for getting into hard to reach areas behind sink bowls, a pipe wrench, good plumber’s putty, silicone sealant (which can be used for a clear leak sealant), and a reliable bucket to collect water from the old pipes. You’ll also need a hacksaw or PVC pipe cutter to work with the drain lines, new slip-joint washers and Teflon tape as well.
These are things you can have ready and easily accessible to avoid getting the last minute chaos of needing to venture to the hardware store to find a piece of equipment, maintaining your momentum and roll on the project without interruption and wasting valuable time.
Measuring and Prepping Your Workspace
Accurately measuring the current countertop will ensure your new sink will fit perfectly. Take the measurement of the length, width and depth of the existing hole and note that if the sink is deeper, it will impact where the drain lines hook up to the wall. It is also important to get rid of the cabinet space under.
Clear all cleaning supplies, wastebaskets and shelf liners to give plenty of room to both move around while using wrenches and keep PVC pipes in a comfortable position. A clean, bright area under the sink – maybe with a portable LED work light – can be a lifesaver in detecting minute details, ensuring proper pipe slopes and detecting any minute leaks down the road.
Step-by-Step: Removing the Old Sink and Plumbing
It’s equally important to remove the old parts carefully as it is to install the new parts. The main objective for this stage is to prevent any water damage to existing cabinetry and protect cabinet edges and countertops edges. If the demolition process is rushed, pipes can be forced out of place, resulting in cracked stone countertops, damaged base of a cabinet or water supply valves being stripped, and converting an afternoon swap into a big, expensive repair job.
Shutting Off the Water Supply
The first priority is always to secure the water supply. Find hot and cold shut-off valves underneath the sink. Rotate both valves by turning them all the way clockwise until they stop. If these valves are worn, stiff or corroded to the degree that they cannot be turned without breaking, do not force them; find out where the main water shutoff valve for the house is located and turn off the water at that valve.
After closing the valves, turn the handles of the kitchen faucets to the all the way “on” setting. This very important stage will clear any pressure that was left in the lines and will drain the surplus water, avoiding any unwanted water sprays during disconnection.
Disconnecting the Dishwasher and Disposal
The safety of plumbing and electricity hand in hand is paramount. Unplug the garbage disposal from the electrical outlet under the sink, in a safe manner. Then unplug the corrugated dishwasher drain hose from the disposal or sink tailpiece. As you start to loosen the slip nuts on the PVC pipes, place your bucket directly under the P-traps to collect any wastewater that may be trapped inside that smells bad. Remove the disposal gently from its holding ring, holding its weight to avoid breaking when removing it from the bottom of the cabinet.
Breaking the Seal and Removing the Old Basin
Caulk will harden over time and become a strong adhesive. Use a sharp utility knife to cut the old caulk around the edge of the sink crosswise to the countertop surface, but not through it. Then, slip under the cabinet and remove all metal mounting clips from under the counter. Sinks can be quite heavy and cumbersome to move, so ask for assistance in this last step. While your helper is holding the old basin straight up and out of the counter, carefully push the sink up from below, while your helper supports it with both hands.
How to Install Kitchen Sink Plumbing: Setting the Basin
The first step is to get the physical sink firmly in place in the countertop, before making the complicated pipe connections underneath. The perfect basin installation is the basis of a proper installation, since the surface water of the counter will not run into the cabinetry below, and the heavy plumbing elements that will be suspended below it will have a completely stable base.
Applying Plumber’s Putty and Silicone Sealant
The right use of sealants is needed to create a water barrier. Take a generous amount of plumber’s putty and make a continuous uniform plumber’s putty rope between your hands. Apply this putty firmly around the bottom of the metal sink flanges to ensure a permanent, leakproof joint between the bottom of the sink bowl and the metal flanges. If your stone top is porous (granite, marble, etc.), be sure the putty your plumber is using is rated for stone, or use 100% silicone putty instead because normal putty will leave oil stains. Then bead a continuous line along the bottom edges of the sink basin, before carefully dropping the sink gently in the planned counter space.
Mounting the Sink and Securing the Clips
Once the sealants are applied, drop the sink firmly into the cutout, leaving it flush to the countertop surface, and making sure it is in the correct direction – parallel to the front edge of the countertop. Slide under the cabinet to attach and secure the brackets. The key to a good seal is to tighten these clips in a cross pattern, like tightening car tyre lugs. It creates a snug fit, even pressure and a very secure fit while squeezing out excess silicone.
How to Install Kitchen Plumbing for Sink Drains
The mechanical centerpiece of this project is to safely move water from the basin to the home’s principal drainage system. A correctly installed drain system uses gravity to ensure that water is flowing through the system in an efficient manner and that harmful and foul-smelling sewer gases do not enter your kitchen area since there is no way for water to leak from any joints.
Connecting the Strainers and Tailpieces
Start by putting together the sink’s built-in drain assembly. The PVC or brass tailpiece extensions must be directly attached to the bottom of the newly installed sink strainers. Tighten the slip nuts by hand, taking care not to over tighten, especially the internal parts. The thin plastic friction ring and the thicker tapered rubber washer need to be set flat against the ball bearing in the correct direction. The most frequent reason for leaks around the strainers’ base is misalignment of the washers.
Setting Up the P-Trap and Wall Discharge
The P-trap is probably the most critical plumbing under your sink. It keeps a small amount of water in its curved bottom which seals it and prevents foul sewer gases from migrating up the drain and into your home. Determine the distance between your tailpiece and wall discharge outlet and cut PVC pipes to the correct length. Be sure to always dry fit these together first to ensure they fit properly. When geometry is satisfactory, permanently hand tighten and then e.g. hand tighten plus a quarter turn with adjustable pliers, the trap assembly securely to the wall discharge.
How to Install Double Kitchen Sink Plumbing
With a two basin operational system comes a new level of complexity – the waste system. This setup combines two separate sinks to a single drain pipe before it connects to the P-trap. It must be carefully measured and leveled to assure equal draining of the two basins so that no back-up of the wastewater takes place from one basin to the other.
Balancing the Continuous Waste Pipe
You can install a center-outlet or an end-outlet continuous waste kit, depending on how your plumbing is arranged. This kit uses a T-fitting or a baffle tee that connects the two sinks’ drains under the sinks. The crucial element here is the slope. The horizontal pipe must have a slight slope down from the first bowl to the second bowl, but it must not be noticeable. This will help gravity do the work and the water can flow freely towards the main trap, but not stagnate in the horizontal line where grease can quickly build up and cause clogs.
Aligning the Drains to a Single P-Trap
After the horizontal connection is made, link the combined vertical waste pipe down to the combined P-trap that runs to the wall. There are often alignment problems with double sinks as they use stiffer piping. When the angle of the two sink drains to the wall pipe is only slightly off, the tension can typically be adjusted and can be solved with careful adjustments and rotations of the slip-joint fittings. Flexible accordion-style extension pipes are available, but should be used as an absolute last resort since the ridges inside the pipe tend to collect food debris leading to significant food blockages over time.
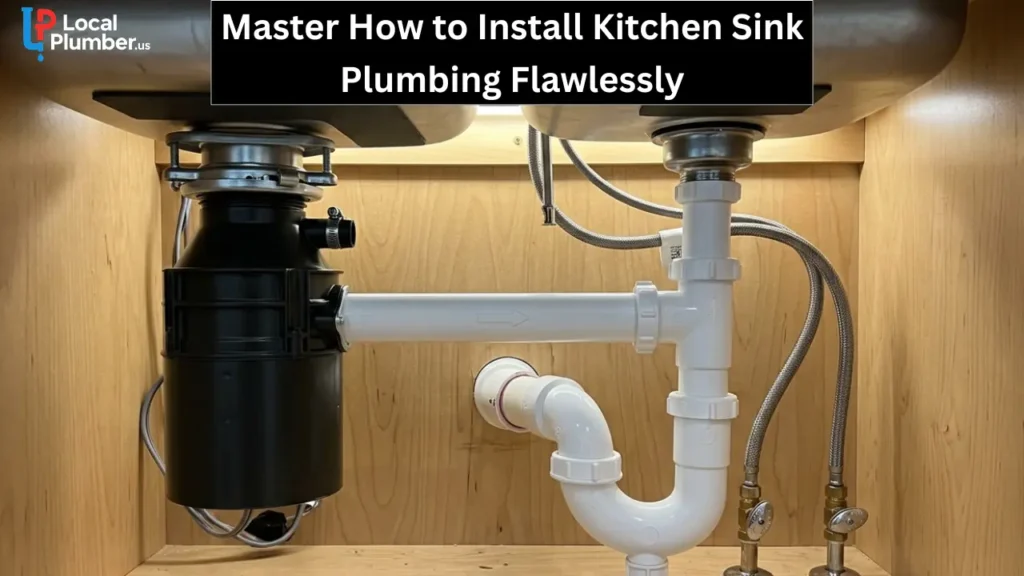
How to Install Kitchen Sink Plumbing With Garbage Disposal
The entire drain configuration under a counter will be changed if you install a heavy appliance such as a garbage disposal. It must be set onto a very firm, anti-vibration base and have to be fitted with some plumbing routes to cope with the huge quantity of water and ground food waste it will produce.
Attaching the Mounting Ring and Flange
Attach the special metal mounting bracket for the disposal to the sink drain opening. This includes pressing the flange into the sink hole and placing the backup rings under the flange and fastening with the included snap ring. After the snap ring is positioned in its groove, secure the three mounting screws equally making sure the backup ring is parallel with the base of the sink. The uncompromising seal is essential to endure the motor’s tough, daily vibration without shaking loose and resulting in serious leaks.
Connecting the Dishwasher Drain and Discharge Tube
The dishwasher connection must be solved before disposing the heavy disposal into the mounting ring. This is an important thing to keep in mind: The plastic dishwasher drain plug is in the side inlet of the disposal and is punched out with the hammer and screwdriver. Failure to remove this plug will cause your dishwasher to spill over in your kitchen on the first cycle of the dishwasher. Remove and lift the disposal, put it on the mounting ring and secure the corrugated dishwasher drain hose to the top inlet. Lastly, route the main black disposal discharge tube down, directly into the primary PVC P-trap system with rubber gasket and metal flange provided.
Finalizing Your Kitchen Plumbing Project
The physical installation and heavy lifting of the system is over but there is still one big hurdle to get the water supply back online. By dedicating time and patience to this process you can ensure that your efforts result in a fully functional, super-efficient and bone dry under-sink space.
Reconnecting Hot and Cold Water Lines
Pick up the braided, flexible lines that lead from the new faucet, and carefully slide them into the wall shutoff valves. Be sure to match hot to hot, and cold to cold, (usually left to left and right to right). Hand thread these connections on to prevent cross-threading, and use an adjustable wrench to secure these connections. It’s easy to over tighten these nuts, so be sure to be extra careful not to put too much pressure on it or the fine metal threads can be stripped or the gasket rubber can be crushed, resulting in the exact leak you are looking to avoid.
Testing for Leaks and Troubleshooting
When switching back to the main water valves, they are turned on very slowly which is the “moment of truth.” Before opening the valves, listen for any hissing or rushing water sounds to pause and listen carefully. With pressure restored, turn the kitchen faucet full force, filling both kitchen bowl basins. Open the water and start the garbage disposal at the same time, to mimic high garbage disposal load.
When the water is flowing, use a dry paper towel to wipe each new slip nut, shutoff valve and drain flange area thoroughly. The dry paper towel will instantly catch even the smallest of water leaks and you will be able to see and squeeze out any joints that need a bit more pressure.
When to Call a Nationwide Professional Plumber
Although it can be highly satisfying to install a sink on your own and save money, there are some structural issues that call for licensed skills. It’s not a bad thing to admit you’re out of your comfort zone with a project. When the old sink is removed only to find that the pipes connected to the main wall drain are heavily corroded or falling apart, when the main wall drain lines have to be moved significantly deeper inside the wall to fit with a deeper sink basin, or when there are chronic dripping leaks that can’t be solved with just a slip nut, it’s time to step back.
You can rely on a reputable plumbing service (Like Localplumber.us) that’s available nationwide to ensure that your home will be well protected from severe water damage and all your underlying pipes will be in compliance with modern building codes.
The Final Verdict on Your Kitchen Sink Upgrade
Installing one’s own kitchen sink plumbing is a very rewarding home improvement project, and can help develop some serious DIY confidence while saving hundreds of dollars in plumbing labor costs. A well-timed measurement of your clearances, the proper application of quality sealants and a second look at each slip-nut connection under your basin can result in a perfect sanitary surface with no leaks.
The only thing to keep in mind when it comes to long-lasting plumbing is patience – do not force a stiff valve, do not overtighten a plastic thread, and always perform a leak test before filling your cabinet with cleaning products. Your kitchen is now ready for lots of hard use every day for years with your new basin firmly in place and your drain system balanced.
FAQs About How To Install Kitchen Sinks Plumbing?
Do you need a permit to replace kitchen sink plumbing?
In most municipalities, replacement of an existing sink, installation of a new faucet and reconnection of the P-trap in the same location will not require a building permit. But if you’re planning your kitchen remodeling to include a new plumbing circuit in an island, a new main drainage stack or moving water supply lines inside the wall, the local building and plumbing codes usually require a permit and a professional inspection.
Can you reuse the old PVC drain pipes?
Old slip-joint pipes can be reused but it’s not usually advised by professionals. The plastic threads wear out and when moved, the rubber washers inside start to compress, get brittle and fail. A little money spent on a new PVC P-trap and a new continuous waste kit for a double sink ensures sharp threads and soft seal, making the likelihood that you will have hidden leaks destroying your cabinet floor practically non-existent.
Why does a new deep sink complicate the plumbing installation?
Modern farmhouse and sleek undermount sinks tend to be much deeper than the standard, old sinks that were once used for drop-in sinks. Since all wastewater must be gravity-fed for efficient drainage, your new sink (and therefore P-trap) may be set lower than the existing drain pipe sticking out of the wall. When this imbalance in gravity occurs, water will not flow into the wall discharge from the sanitary tee, and the drywall will have to be opened to ensure the connection between the sanitary tee and the wall discharge is lowered.
What happens if I forget to remove the garbage disposal plug?
A new garbage disposal, without a dishwasher drain hose, and the connecting plastic hose without a hammer and screwdriver to prise out the factory-made plastic plug, and the dishwasher will have no place to pump its wastewater. On the first wash cycle, the dirty water will quickly back up and spill out of the dishwasher’s air gap, or it will simply back up past the dishwasher’s door seal, straight onto the floor of your kitchen.
Is it possible to install a garbage disposal on a single basin sink?
Absolutely. It is not uncommon to have continuous waste systems on double sinks, but a single basin sink is also fine for a garbage disposal. The installation itself is easier – you attach the disposal to the one drain flange and you run the black disposal tube directly down to the P-trap, rather than having to use a T fitting or having to balance the slope between two separate bowls.